I just sent off the last of my photoshop assignments for the semester, and thought I would share with you some of the fun ones.
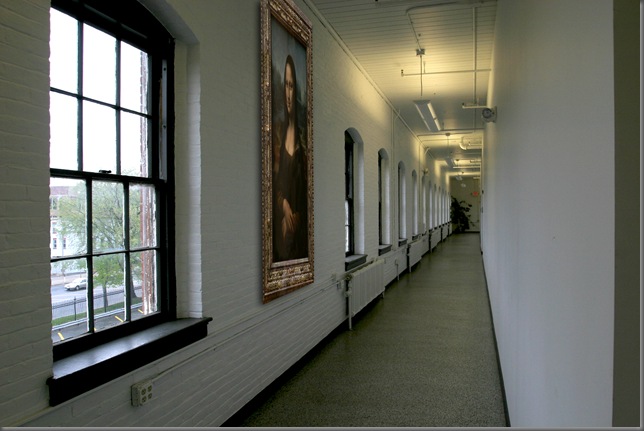
Here’s a photo of the hallway on the third floor of the Graphic Arts building.

See that second window? Watch this.

That was a lot more fun than it looked. Here’s my after-action report (handed in with the finished product five minutes ago).
First, I opened the hallway photo in lightroom (if you don’t know what Adobe Lightroom is, you owe it to yourself to find out) to adjust the lighting. I could have used photoshop's camera raw dialogue, but the lightroom interface is much more user-friendly.
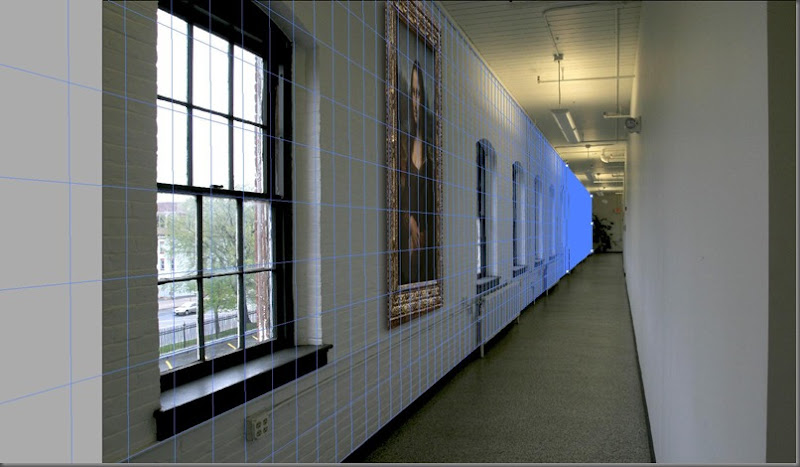
Once I was satisfied with the levels, I opened the image in Photoshop and created a vanishing point grid, using the corner between the wall and the floor, as well as the corner of the wall and the ceiling for reference. I then used a combination of the patch tool, heal brush and spot heal to brick up the window.
Next I did a google image search for "framed Mona Lisa." I found a high-resolution image, which I then pasted onto the vanishing point grid. I shrank it a little, but I don't know how big the Mona Lisa actually is, so I made it look as big as a painting.
Once I had the painting positioned on the wall, I used the "fx" button on the layers panel to add a drop shadow. Finally, I used the curves dialogue to adjust the light on the painting. It still looked a little unnatural, so I used the brush tool at an opacity of 40 and a color of 64 grey (in darken mode) and went over the entire painting once.
Since there are undoubtedly those of you who don’t know what a “vanishing point grid” is, here’s the one I made for this project

It’s a grid that not only serves as a guide for you, but also tells photoshop how to render things like… paintings that you just pasted into the image. So instead of this project taking five hours of mind-numbing skewing and transformations, it took about five minutes to setup the grid, roughly nine seconds to add the shadow, and two or three minutes to get the lighting just right on the painting.
Next: Here’s a photo that I’m not in.

I know what you’re thinking. “Andy, you’re standing right there, just left of center. I know it’s you because your hair looks awesome.” And you’re somewhat correct. My hair is awesome. But I’m not really in this photo. The professor took a photo in the computer lab. He got up on a ladder with a camera and put a flash in the corner (or maybe he opened a window. I’m not sure because I wasn’t there). Then he took a photo of me in the portrait studio, on the same ladder with the same lighting. Then he gave me both photos and said “do.”
So here’s what I did:
I first made a selection using the quick mask method. I then copied myself from the photo in the studio into the photo of the computer lab. I immediately realized that my selection had not been good enough, so I used a layer mask to clean it up. I attempted to use gradients and fuzzy brushes to mask my hair, but success eluded me. So I gave myself a digital haircut. I removed enough hair to make masking reasonable, but left enough to allow it to still look a bit unkempt (nobody would believe a photo of me, on a school day, with great hair).
Next, I had to shrink myself. I used what I could see of other people in the shot to judge how large I should be (mostly the hand of the woman sitting at the right edge of the frame). Once I had shrunk myself and cleaned up the layer, I duplicated it. Next I made a selection on the new layer using the easy-selection tool (I think that's what it was called. It's the one on the same button as the magic wand). Having made a selection, I filled it with black.
I then skewed the black selection to the right by grabbing the top-center handle. I used the shadow of the monitor on the left side of the frame to judge the direction my shadow should fall. Once that was done, I added a gaussian blur, layer mask and a gradient. Then I had to throw away my shadow because I had forgotten to fix its feet and had ended my photoshop session.
Once I had my shadow correctly positioned again, I used a black brush to connect my shadow to my feet and generally reshape it a bit to make it look natural. Next, I added a (hefty) gaussian blur to the shadow. I then duplicated the shadow layer and added an even heavier blur to the new layer. Finally, I added a layer mask to the original shadow and applied a linear gradient to it to make it blend with the second shadow layer.
That was hella fun. The most awful part was my hair. Here’s the photo I started with, and the same photo with my quick mask.


Zoom in on one of those and see how horrible my hair was that day. Had I known it was picture day, I would have worn a hat. Or gelled my hair back. Or something. Giving myself a digital haircut was educational and wortwhile, but man it was a bitch.
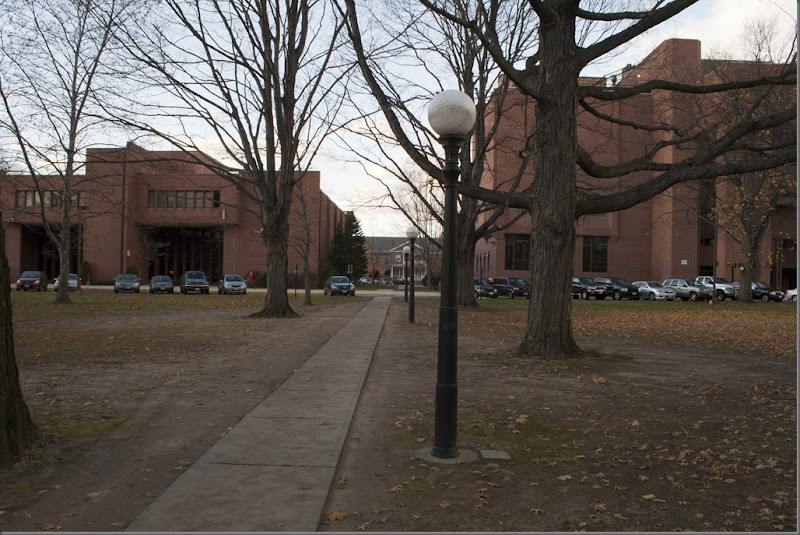
Next is depth of field. The assignment was to create depth of field where there was once none. So I had to take a photo with my aperture closed as tight as it would go and still get decent exposure. I just happened to have my Rebel with me that day, so I walked around campus and took some long shots with stuff in them. here’s the photo I started with:

I made this one a bit bigger, so you can see clearly that you can see everything clearly. Here’s my report:
I first created a new layer on top of the background and named it “sharp.” I then painted that layer white, beginning with the lamppost most in the foreground. I then expanded my sharp mask to include a wide area surrounding the lamppost and extending it across the photo.
Next, I added a new layer and named it “128.” I painted this layer at 128 grey. I included the tree nearest the camera and the area surrounding the sharp layer. My next layer was painted at 64 and included the first tree back from the lamppost, as well as the next closest lamppost. The next layer was painted at 32 and included the next two trees. The final layer I filled with black.
The black layer was on the bottom, with the white “sharp” layer on top. I applied a mild gaussian blur to every layer beneath the white layer, with the exception of the background. There were a couple of holes, so I painted them the color of the layer under them using the brush tool.
Next, I merged all of my greyscale layers and copied the new mask layer to a new channel (alpha 1). returning to layer view, I hid the mask layer, showing only the background.
Finally, I added a lens blur to the image, using Alpha 1 as my source. I cranked the focal distance to 255 and adjusted the radius until I thought the transitions between focus areas looked natural.
It was at this point that I noticed my sharp lamppost had sharp points sticking out of it. So I canceled the lens blur and deleted alpha 1. I edited my merged mask layer with the brush tool and smoothed out the globe of the lamppost. I then copied the layer to alpha 1 again and re-applied the lens blur.
And here’s my final product:

And here’s the mask layer that I drew by hand (three hours’ work), then converted to a color channel to create a variable lens blur.

That was fun, but damn was it time-consuming. The trees especially took a long time. Then I blurred most of them out of existence before I applied this mask. But overall I think it was worth detailing every single twig (until I got bored). So the white area is the part to which I added no blur at all. The black area received the heaviest blur, and the three grey areas got blurred differently depending on how dark a grey I used (128, 64 and 32, if anyone cares).
This was one of the early projects. It took several weeks, but I really learned a lot from it. So here it is. First, the photo I was given. I show you this one at full size because a lot of work went into it and I want you to see everything.

Here’s my finished product:

This one is not quite perfect in certain spots, and that’s somewhat intentional. This project was handed in as a 300 dpi print, which isn’t high enough resolution for the line between the sky and the horizon to even be printed on a 4x6. Long story short, I removed the stain, repaired the rips, cleaned up the mold, squared the edges of the photo, re-colore the borders and drew the sky. Granted, the sky is a bit much. But I have the 64-bit edition of photoshop demo and the Mac-tards at school only have the 32-bit edition. So I flaunt it whenever I can. In this story, by rendering a light source (the sun) in the sky.
My professor agreed that it was going to far, but gave me points (actual grade points, not just kudos) for taking a risk and trying something that would be either disastrous or awesome.
There was one other assignment, but it was basically the same thing as the one where I put myself in the photo. And I didn’t do as well on it, so I won’t show it to you (at least not right now).
So… Enjoy. Next post I write will be my abbreviated album from Arizona. I say abbreviated because over the course of the week I took almost 5000 photos. You’ll be getting the best… uh… fifty. maybe fifty. I dunno. The slideshow I showed everybody at Thanksgiving was a hundred I think. Maybe I’ll just upload that. We’ll see. Stay classy.


